


Photo by Haithem Ferdi on Unsplash
Boost Your Application’s Performance with Virtual Threads in Java and Spring
Exploring Project Loom


In my previous banking project, we had a situation where we received thousands of requests for authentication. To ensure security, we relied on a third-party system to send SMS OTPs for verification. However, sometimes the third-party system took longer than expected to acknowledge the request, causing delays. Thread per request model was utilized which means number of threads are in waiting state and new requests are in pool. We tried to optimise the performance by finetuning number of threads, I wish we had virtual thread feature at that time. At that time, virtual thread concepts were not available in Java. This is where Project Loom comes into play.
What is Project Loom?
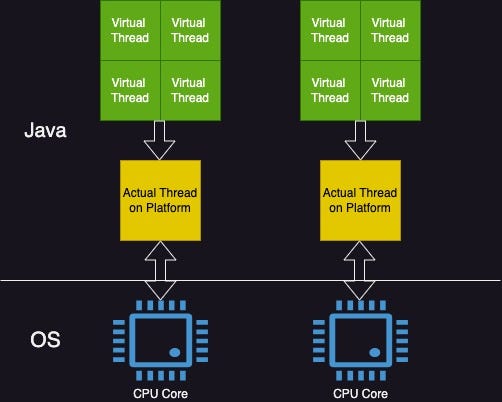
Project Loom acts as a helpful tool that aims to simplify your life as a developer. Its main objective is to make it easier for you to write, maintain, and observe applications that need to handle multiple tasks concurrently. It achieves this by introducing a concept called “virtual threads.”
So, what exactly are these virtual threads? Well, they are a smart solution that can enhance the performance and scalability of your applications. They are specifically designed for situations where you encounter what we refer to as “blocking APIs.” These are parts of your code that may pause and wait for something to happen, such as waiting for a response from a database or an external service.
Now, here comes the exciting part: virtual threads are planned to be included in the next version of Java Development Kit (JDK 21). This means they might also be available in the upcoming Spring Framework 6.1, which is scheduled for release later this year. As Spring developers, it’s crucial for us to grasp the concept of virtual threads and understand why they are significant in our development process.
How to use Virtual Threads
Let’s create a simple Spring Boot MVC application with Java 20 (or Java 19) and Spring Boot 3.1. The application will have one endpoint called “/home” that returns the name of the thread with a predefined time delay. The code of this demo is available to clone at github
Step 1: Create project using Spring Initializer or your IDE. Add dependency of spring-web and add metadata. When you open project in IDE, ensure you update pom.xml as below to ensure preview features are enabled which is disabled by default.
            <plugin>
                <groupId>org.springframework.boot</groupId>
                <artifactId>spring-boot-maven-plugin</artifactId>
                <configuration>
                    <compilerArguments>--enable-preview</compilerArguments>
                </configuration>
            </plugin>
Step 2: Create Controller and Service class
Create controller class called HomeController and HomeService class as below
@RestController
@RequestMapping("/")
public class HomeController {
    @Autowired
    HomeService homeService;
    @GetMapping("/home")
    public String getResponse(){
       return homeService.getResponse();
    }
}
@Service
public class HomeService {
    private static final Logger LOGGER = LoggerFactory.getLogger(HomeService.class);
    //This method will add delay in execution and return name of thread
    public String getResponse(){
        //Adding sleep
        int sleepTime = 250 ; //new Random().nextInt(1000); -- Uncomment the line if you want to add random delay

        try {
            TimeUnit.MILLISECONDS.sleep(sleepTime);
        } catch (InterruptedException e) {
            LOGGER.error( e.getMessage());
        }
        return "Current Thread Name: " + Thread.currentThread().toString();
    }
}
Step 3: Test the application
This will create simple rest service without virtual threads, lets test it out and see if we get everything running using postman or browser

Lets enable virtual thread now by adding below in Application main class
@Bean
    TomcatProtocolHandlerCustomizer<?> protocolHandlerVirtualThreadExecutorCustomizer() {
        return protocolHandler -> {
            protocolHandler.setExecutor(Executors.newVirtualThreadPerTaskExecutor());
        };
    }
This bean is a customizer for a Tomcat protocol handler. The Tomcat protocol handler is responsible for handling incoming requests in a Spring Boot application. The purpose of this customizer is to configure the executor used by the protocol handler.
Inside the protocolHandlerVirtualThreadExecutorCustomizer method, a lambda expression is used to customize the protocol handler. The protocolHandler parameter represents the instance of the Tomcat protocol handler being customized.
Within the lambda expression, the setExecutor() method is called on the protocolHandler object. This method is used to set the executor for the protocol handler. An executor is responsible for executing tasks, such as handling incoming requests.
In this specific case, the Executors.newVirtualThreadPerTaskExecutor() method is used to create a new executor that uses virtual threads. Virtual threads are lightweight threads that can execute tasks concurrently within a single operating system thread. This means that multiple tasks can be executed simultaneously, improving performance and resource utilization.
Restart the application and test again, you will see virtual thread name now like below

Performance test comparison
I tested this application with Gatling. Gatling is a popular load testing tool that can be used to simulate user behavior and test the performance of Spring Boot applications under different levels of load and stress. I have wrote an article on How to use gatling for performance testing. Click here to know more.
I conducted tests on the application using four scenarios: one with a 100ms sleep duration and another with a 250ms sleep duration. I tested both scenarios with and without virtual threads. During the tests, I simulated 100 parallel users sending requests to the endpoint, and each user made 50 requests, resulting in a total of 5000 requests.
With Gatling we can report in beautiful UI like below
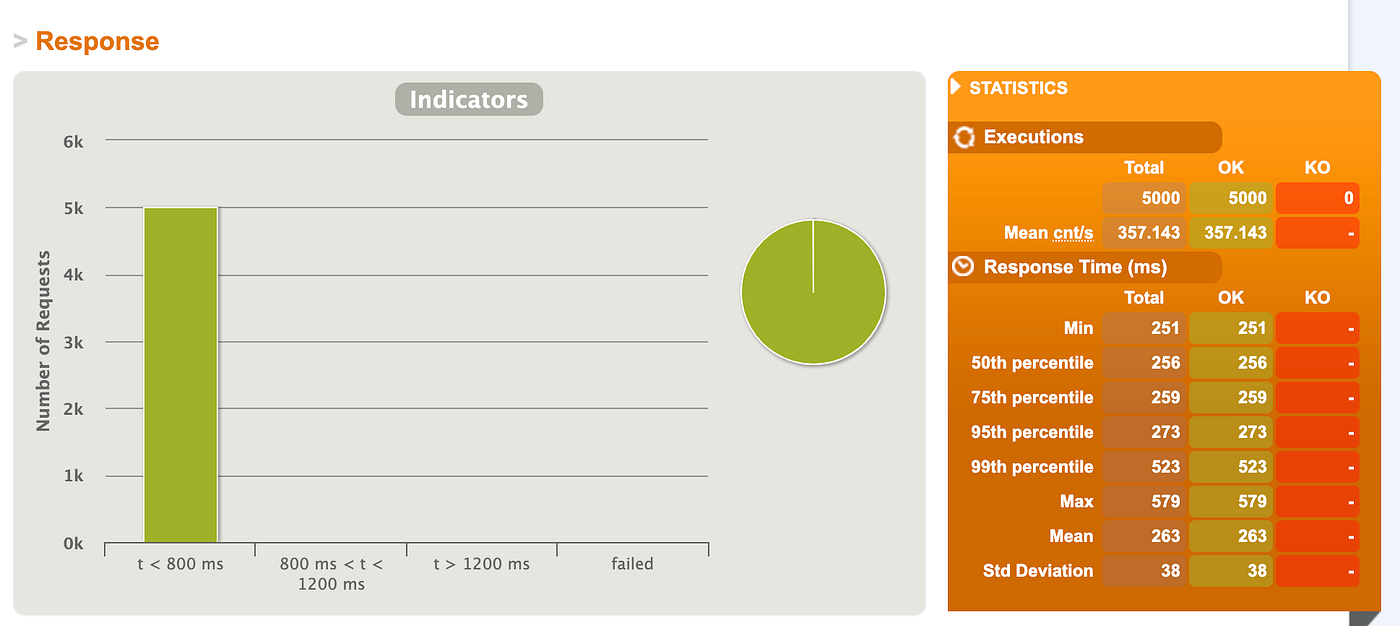
With 100ms delay below is summary of test. All the response times are in ms.
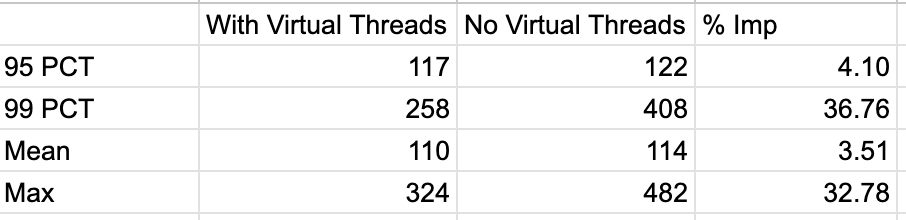
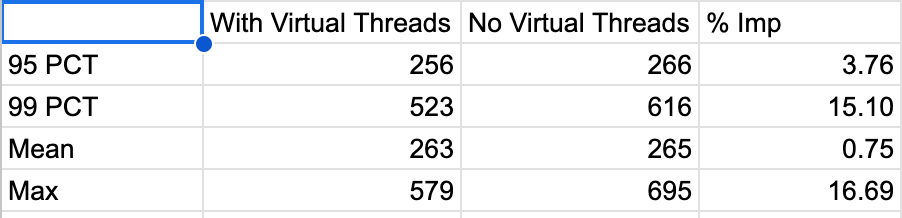
With 250ms delay below is summary of test.
Summary
In this blog, we explored the concepts of virtual threads and Project Loom. We discovered that virtual threads are particularly beneficial for handling blocking operations, where parts of our code need to wait for something to happen. To put virtual threads into practice, we created a Spring MVC application and took advantage of the virtual thread preview feature available in Java 19/20. This allowed us to utilize virtual threads in our application and reap their potential benefits.
To assess the impact of virtual threads on application performance, we conducted performance load tests. These tests involved subjecting our application to a high number of concurrent users and requests to see how it handled the workload. By comparing the results with and without virtual threads, we could evaluate the performance improvements brought about by leveraging virtual threads.
If you like my content please consider to subscribe my blog and follow me so next article come directly in your inbox. Here is link