


Demystifying JWT: A Comprehensive Guide for Spring Boot Applications


What is JWT token
JWT stands for JSON Web Token. It is a compact, URL-safe means of representing claims between two parties. In the context of a Spring MVC application, JWT tokens are commonly used for authentication and authorization purposes.
Here’s how it works:
User Authentication: When a user logs into a Spring MVC application, their credentials (e.g., username and password) are typically sent to a server for verification. Once the server verifies the credentials, it generates a JWT token.
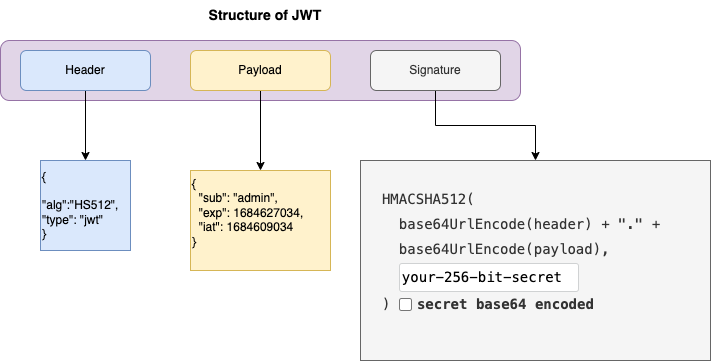
JWT Structure: A JWT token consists of three parts: a header, a payload, and a signature. The header contains information about the type of token and the signing algorithm used. The payload contains claims or statements about the user, such as their user ID or role. The signature is used to verify the integrity of the token.
Token Generation: In a Spring MVC application, once the server verifies the user’s credentials, it generates a JWT token by encoding the necessary information into the token’s payload. This encoded token is then returned to the client (usually in the response body or a response header).
Token Usage: The client (usually a web browser or a mobile app) receives the JWT token and includes it in subsequent requests to the server. This is typically done by adding the token to the request headers, commonly using the “Authorization” header with a value like “Bearer <token>”. The server can then extract and validate the token.
How to use JWT token for Session management in Spring boot application
The working application code can be found here
Using JWT tokens for session management in a Spring-based application can provide a stateless and secure approach. Here’s a simplified explanation of how you can achieve session management using JWT tokens:
- When a user logs in or authenticates, generate a JWT token on the server-side. This token will contain information about the user, such as their username or user ID.
Here is sample User Service class, in production user information is stored in database with encryption.
@Service
public class UserService implements UserDetailsService {

    @Override
    public UserDetails loadUserByUsername(String userName) throws UsernameNotFoundException {
        List<GrantedAuthority> grantedAuthority = new ArrayList<>();
        grantedAuthority.add(new SimpleGrantedAuthority("Read"));

        //Logic to get the user form the Database
        if(userName.equals("user")) {
            return new User("user", "password", new ArrayList<>());
        } else {
            return new User( userName, "password", grantedAuthority);
        }
    }
}
2. Store the generated JWT token on the client-side, typically in local storage or a cookie. This allows the client to send the token with subsequent requests to the server.
3. On the server-side, configure your Spring application to validate and extract the JWT token from incoming requests. You can create a custom authentication filter or interceptor to handle this process.
Here is sample authentication filter class’s doFilterInternal method implementation
@Override
    protected void doFilterInternal(HttpServletRequest httpServletRequest, HttpServletResponse httpServletResponse, FilterChain filterChain) throws ServletException, IOException {
        String authorization = httpServletRequest.getHeader("Authorization");
        String token = null;
        String userName = null;

        if(null != authorization && authorization.startsWith("Bearer ")) {
            token = authorization.substring(7);
            userName = jwtUtility.getUsernameFromToken(token);
        }

        if(null != userName && SecurityContextHolder.getContext().getAuthentication() == null) {
            UserDetails userDetails
                    = userService.loadUserByUsername(userName);

            if(jwtUtility.validateToken(token,userDetails)) {
                UsernamePasswordAuthenticationToken usernamePasswordAuthenticationToken
                        = new UsernamePasswordAuthenticationToken(userDetails,
                        null, userDetails.getAuthorities());

                usernamePasswordAuthenticationToken.setDetails(
                        new WebAuthenticationDetailsSource().buildDetails(httpServletRequest)
                );

                SecurityContextHolder.getContext().setAuthentication(usernamePasswordAuthenticationToken);
            }

        }
        filterChain.doFilter(httpServletRequest, httpServletResponse);
    }
4. When a request with a JWT token is received, validate the token’s signature and integrity to ensure it hasn’t been tampered with. You can use a JWT library, such as jjwt, to simplify this process.
if(jwtUtility.validateToken(token,userDetails)) {
                UsernamePasswordAuthenticationToken usernamePasswordAuthenticationToken
                        = new UsernamePasswordAuthenticationToken(userDetails,
                        null, userDetails.getAuthorities());

                usernamePasswordAuthenticationToken.setDetails(
                        new WebAuthenticationDetailsSource().buildDetails(httpServletRequest)
                );
5. After validating the token, extract the user information from the token’s payload. This information can be used to identify the authenticated user and perform any necessary authorization checks.
Here is sample security config class’s configure method
 @Override
    protected void configure(HttpSecurity http) throws Exception {
        http.csrf()
                .disable()
                .authorizeRequests()
                .antMatchers("/authenticate")
                .permitAll()
                .anyRequest()
                .authenticated()
                .and()
                .sessionManagement()
                .sessionCreationPolicy(SessionCreationPolicy.STATELESS);
        http.addFilterBefore(jwtFilter, UsernamePasswordAuthenticationFilter.class);
6. If the token is valid and the user is authenticated, allow the request to proceed and access the requested resources or perform the requested actions.
7. If the token is invalid or expired, deny the request and require the user to reauthenticate. You can send an appropriate error response to the client indicating that the token is invalid or has expired.
8. To implement session expiration or logout functionality, you can set an expiration time for the JWT token when generating it. Once the token expires, the client will need to reauthenticate to obtain a new token.
9. If a user logs out or wants to terminate their session, you can simply instruct the client to discard the JWT token stored on their side. This way, even if the token is stolen, it becomes useless because it is no longer valid for authentication.
By using JWT tokens for session management, you can eliminate the need for server-side session storage, which can simplify scalability and improve performance. Each request carries all the necessary authentication information in the token itself, making the authentication process efficient and stateless.
Problems with JWT token implementation
- Session invalidation / How do you log out the user?
Revoking a JWT token before its expiration requires additional mechanisms beyond the standard JWT specification. Since JWT tokens are stateless and self-contained, they don’t provide a built-in method for immediate revocation. However, there are a few approaches you can consider to achieve token revocation but that will make application slightly stateful rather than stateless:
Token Blacklisting: Maintain a blacklist of revoked tokens on the server. When a user logs out or their access needs to be revoked, add the token to the blacklist. Before accepting a JWT token, the server checks if it is present in the blacklist. If it is, the server rejects the token, considering it revoked. This approach requires server-side storage to maintain the blacklist.
Short Token Lifetimes: Set relatively short expiration times for JWT tokens. By making tokens expire quickly, the window of opportunity for an attacker to misuse a stolen token is minimized. This approach doesn’t offer immediate revocation, but it reduces the token’s usefulness after a short period.
Refresh Tokens: Implement a separate type of token called a refresh token alongside the JWT token. The JWT token has a short expiration time, while the refresh token has a longer expiration time. When the JWT token expires, the client uses the refresh token to request a new JWT token from the server. If a refresh token is compromised or needs to be revoked, the server can invalidate it, effectively revoking the associated JWT token as well. This approach requires additional complexity to manage the refresh token lifecycle.
2. Redundant signing
Cryptographic signatures are one of the key advantages of using JWTs. These signatures allow the receiving party to verify the authenticity and trustworthiness of a JWT.
However, here’s an interesting fact: Almost every web framework developed in the past decade provides a similar cryptographic signature feature for plain old session cookies. So, even without using JWTs, you can still enjoy the benefits of cryptographic signatures.
Most web frameworks automatically handle the cryptographic signing (and sometimes even encryption) of your cookies. This means that you get the same advantages as using JWT signatures, but without actually using JWTs.
In many web authentication scenarios, the JWT data is actually stored within a session cookie. So, you end up with two layers of signing: one on the cookie itself and another on the JWT.
While having two layers of signing might seem like a good idea, it’s not really beneficial in terms of security. In fact, it requires additional CPU cycles to validate both signatures, which can impact performance, especially in web environments where milliseconds matter. This is particularly true in single-threaded environments like Node.js, where heavy computational tasks can block the main event loop and slow down the application.
3. Large token size
In comparison to plain cookies, token size tends to be larger. Tokens, such as JWTs, typically contain additional information in their payload, including user details and permissions. This additional information contributes to the larger size of tokens. On the other hand, plain cookies generally store a smaller amount of data, often limited to session identifiers or basic authentication information. It’s important to consider the impact of token size when designing and implementing authentication systems, as larger tokens can affect network bandwidth, storage requirements, and overall performance.
Summary
This article provides an introduction to JSON Web Tokens (JWT) and explains how to use them in a Spring Boot application. It covers the process of generating and validating JWTs for authentication purposes. Additionally, the article discusses some limitations and disadvantages of using JWTs, such as token revocation challenges and potential security risks if not implemented correctly.