


Table of contents
- GitHub - amithimani/spring-https: Demo project for Spring Https for Zero trust Security
- This is a sample Spring Boot application named "spring-https" that demonstrates how to enable HTTPS and redirect HTTP…
- Step 1: Create SSL certificate
- Step 2: Enable HTTPS in Spring Boot
- Step 3: Redirect requests to HTTPS connection
- Step 4: Distribute the SSL Certificate to Clients
- Summary
Normally, when someone logs into a network, we assume they’re trustworthy. But with zero trust security, we’re more cautious. We check and verify every user, device, and application, no matter where they’re located or what network they’re using. This helps us make sure that only authorized people and systems can access our Spring MVC applications.
Think of it like this: in traditional security, once someone gets through the front door, we trust them to some degree. But with zero trust security, we keep verifying their identity and checking their permissions, even after they’re inside.
By using zero trust security, we get some big benefits. First, our applications become much more secure. Even if someone manages to break through one layer of security, they still have to go through many more layers, which makes it much harder for them to cause any harm.
Second, we have better visibility into what’s happening in our applications. We can see who’s doing what and monitor for any suspicious activities in real-time. This helps us respond quickly if we detect any potential threats.
Third, we can control access to our applications in a very detailed way. We can set up rules and policies that determine who can access specific parts of our applications based on factors like their roles, the health of their devices, where they’re located, and other relevant information.
Lastly, zero trust security reduces the chances of successful attacks. Instead of relying on just one line of defense, like a locked gate, we secure each individual component of our applications. This way, even if one part is compromised, the rest remain protected.
By implementing SSL-based communication, we enhance the security of our application and contribute to achieving the principles of zero trust security. SSL encrypts the communication between the microservices or server and clients, protecting it from unauthorized access or interception. It helps establish a secure and trusted connection, ensuring that sensitive data remains confidential during transmission.
How To Achieve Secure Communication
In this tutorial, we will cover the following steps to enhance the security of our application using SSL-based communication:
Generate an SSL Certificate: We will generate an SSL certificate, which is a digital file that verifies the authenticity of our application’s server. It acts as a trusted identity card, ensuring secure communication between the server and clients. It serves the purpose of encrypting the communication but doesn’t provide the same level of trust as a commercially-signed certificate.
Enable HTTPS in Spring Boot: We will configure our Spring Boot application to use the SSL certificate for secure communication. This involves modifying the application’s configuration to enable the HTTPS protocol.
Redirect HTTP Requests to HTTPS: To ensure that all communication occurs over a secure connection, we will set up our application to redirect any incoming HTTP requests to HTTPS. This ensures that all data transmitted is encrypted and protected.
Distribute the SSL Certificate to Clients: We need to distribute the SSL certificate to clients who will be accessing our application. This step ensures that clients can trust the server’s identity and establish secure communication.
Whole codebase is checked in to Github
GitHub - amithimani/spring-https: Demo project for Spring Https for Zero trust Security
This is a sample Spring Boot application named "spring-https" that demonstrates how to enable HTTPS and redirect HTTP…
Step 1: Create SSL certificate
First, we need to generate a pair of cryptographic keys and use them to create an SSL certificate. This certificate will be stored in a keystore, which acts as a database for cryptographic keys, certificate chains, and trusted certificates. The keystore keeps our SSL certificate secure and accessible.
To enable HTTPS in our Spring Boot application, we will provide it with the keystore containing the SSL certificate. There are two common formats for keystores: JKS and PKCS12. JKS is a Java-specific format, while PKCS12 is an industry-standard format recommended since Java 9. We will explore how to use both formats.
To generate an SSL certificate in a keystore, follow these steps:
1. Open your Terminal or command prompt.
2. To create a JKS keystore, run the following command:
keytool -genkeypair -alias springboot -keyalg RSA -keysize 4096 -storetype JKS -keystore springboot.jks -validity 3650 -storepass password
3. To create a PKCS12 keystore (recommended), run this command instead:
keytool -genkeypair -alias springboot -keyalg RSA -keysize 4096 -storetype PKCS12 -keystore springboot.p12 -validity 3650 -storepass password
Now, let’s break down the command we just ran:
- genkeypair: Generates a pair of keys for encryption.
- alias: Specifies a name for the generated item.
- keyalg: Specifies the cryptographic algorithm used for key generation.
- keysize: Specifies the size of the key.
- storetype: Specifies the type of keystore.
- keystore: Specifies the name of the keystore file.
- validity: Specifies the number of days the certificate will be valid.
- storepass: Sets a password for the keystore.
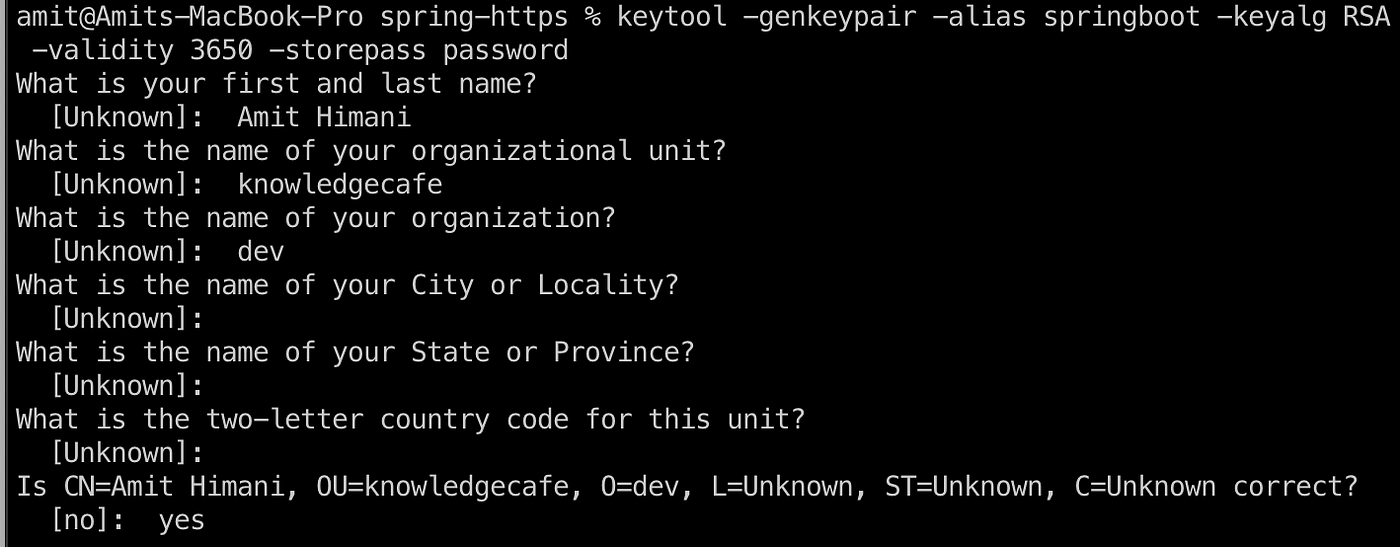
When running the command, you will be prompted to enter some information. However, you can simply press Enter to skip each option if you wish. When asked to confirm the information, type “yes” and press Enter. Finally, press Enter again to use the keystore password as the key password as well.
Convert a JKS keystore into PKCS12
Should we have already a JKS keystore, we have the option to migrate it to PKCS12; keytool has a convenient command for that:
keytool -importkeystore -srckeystore springboot.jks -destkeystore springboot.p12 -deststoretype pkcs12
Step 2: Enable HTTPS in Spring Boot
For demo purpose I create simple project with only one endpoint which returns simple greeting string. Refer this repo for full code
Create application.yml file or application.properties if you prefer
server:
  ssl:
    key-store: ./springboot.p12
    key-store-password: password
    key-store-type: pkcs12
    key-alias: springboot
    key-password: password
  port: 8443
Here are some easy-to-understand explanations of the configuration properties related to SSL in Spring Boot:
server.port: This property specifies the port on which the server listens for incoming connections. In our example, we have used port number 8443 instead of the default port 8080.server.ssl.key-store: This property defines the path to the keystore file that contains the SSL certificate. In our case, we want Spring Boot to search for the keystore file in the classpath.server.ssl.key-store-password: This property sets the password required to access the keystore file. It ensures that only authorized users can access the SSL certificate stored in the keystore.server.ssl.key-store-type: This property specifies the type of keystore being used, which can be either JKS (Java-specific format) or PKCS12 (industry-standard format). It helps Spring Boot understand the structure and format of the keystore file.server.ssl.key-alias: This property identifies the specific key within the keystore that should be used. It acts as a unique identifier for the SSL certificate within the keystore.server.ssl.key-password: This property sets the password needed to access the specific key within the keystore. It ensures that only authorized users with the correct password can use the SSL certificate associated with the key.
By configuring these properties correctly, we can ensure that the Spring Boot application listens on the desired port, uses the correct SSL certificate from the keystore, and enforces password-based access control to the keystore and individual keys within it.
Step 3: Redirect requests to HTTPS connection
When we employ Spring Security, we have the ability to set it up in a way that automatically blocks any requests arriving through an insecure HTTP channel and redirects them to the secure HTTPS channel.
To accomplish this, we can create a class called SecurityConfig. This class will gather all the security policies and configure our application to mandate a secure channel for every request. Additionally, we can temporarily authorize all requests, allowing us to concentrate on testing the behavior of HTTPS instead of focusing on user authentication strategies.
@Configuration
public class SecurityConfig {

    @Bean
    SecurityFilterChain filterChain(HttpSecurity http) throws Exception {
        return http
                .requiresChannel(channel -> channel.anyRequest().requiresSecure())
                .authorizeRequests(authorize -> authorize.anyRequest().permitAll())
                .build();
    }

}
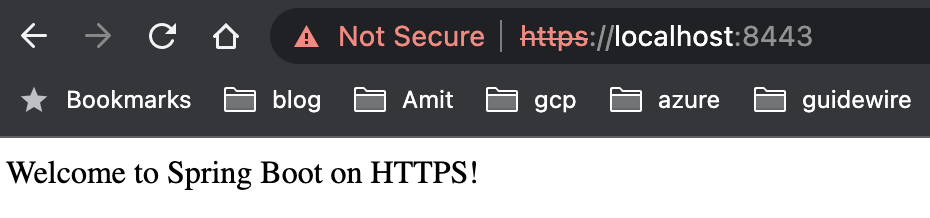
That’s it, now our service is enabled for https connection. You can try using browser and see the response.
Step 4: Distribute the SSL Certificate to Clients
You can see the request has been redirected from port 8080 to 8443. When we utilize a self-signed SSL certificate, our application may not be trusted by web browsers or other clients. As a result, these clients will display warnings indicating that the application is not secure.
To address this issue, we have the option to make the client trust our application by providing them with our SSL certificate. This way, the client can recognize and trust our certificate, establishing a secure connection without any warning messages.
To extract an SSL certificate from a keystore, we can use the keytool command-line tool, which provides convenient functionality. Here’s an example command using keytool:
keytool -export -keystore springboot.p12 -alias springboot -file myCertificate.crt
In this command, we specify the following:
-export: This option instructs keytool to perform an export operation.
-keystore springboot.p12: Here, we specify the keystore file name, which can be in either JKS or PKCS12 format. In this example, it is “springboot.p12”.
-alias springboot: This flag specifies the alias of the certificate entry we want to extract. In this case, the alias is “springboot”.
-file myCertificate.crt: We provide the desired output file name, “myCertificate.crt”, where the extracted certificate will be saved.
When executing this command, keytool will prompt us to enter the keystore password we set earlier in the tutorial. Once we provide the correct password, keytool will extract the SSL certificate from the keystore and save it as “myCertificate.crt”.
Install the certificate: Now, you need to install the certificate in your browser’s trusted certificate store. The process for this varies depending on the browser and operating system you are using. Below are some general steps for common browsers:
Chrome: Go to Chrome settings, then navigate to Privacy and security > Security > Manage certificates. Import the saved certificate file into the “Trusted Root Certification Authorities” or “Authorities” tab.
Firefox: Open Firefox options, go to Privacy & Security > Certificates > View Certificates. Import the saved certificate file into the “Authorities” or “Servers” tab.
Edge: In Edge settings, go to Privacy, search, and services > Security > Manage certificates. Import the saved certificate file into the “Trusted Root Certification Authorities” or “Authorities” tab.
Summary
This article discusses the use of SSL certificates for secure inter-service communication in achieving a zero-trust security model. In a zero-trust environment, no user or system is inherently trusted, and every interaction must be verified.
To establish secure communication between services, SSL certificates play a crucial role. SSL certificates provide encryption, authentication, and integrity to ensure that communication between services remains confidential and trustworthy.
By implementing SSL certificates, services can encrypt the data they exchange, preventing unauthorized access or eavesdropping. Additionally, SSL certificates allow services to authenticate each other’s identities, ensuring that they are communicating with trusted counterparts.